Teaching With Style: Donorschoose

Showing posts with label Donorschoose. Show all posts
I love literacy centers or the Daily 5 for students while I'm teaching guided reading.  One of my staple centers is a listening center.  It has evolved quite a bit over the years.

I started out with about 5 books and tapes that I got from Scholastic book orders.  I had one big tape player with multiple headphone jacks, so I had to hunt down a couple more copies of the books so an entire group of students could listen to one story all together.  I struggled with holding kids accountable and would have them fill out a response sheet, but they often didn't have time to finish before they had to move on to their next center.

I then moved to a new school and taught kindergarten - there was no way my 32 kindergarteners could handle a listening center at the beginning of the year.  I got a Donorschoose project for some Leap Pad interactive books and those were helpful for the next couple of years while my tapes collected dust.


I then moved back to first grade and wanted to bring out the tapes again.  There were some old walkmans in storage at my school that had been used for the Read Naturally program.  The great thing about walkmans is students can listen to the books individually, not with a partner.  They are more on task and can choose books that interest them.  The bad thing about walkmans is they eat up batteries.  I got a new Donorschoose project together for rechargeable batteries and I was set!

The walkmans and rechargeable batteries have been kickin' it for 4 years, now!  But the problem is, the walkmans are starting to break, the tapes are starting to wear out, and I'm starting to get annoyed that kids bring me their walkman everyday and say, "It doesn't work" and they only needed to turn around the tape!  So, I decided to bring my listening center to the 21st century with iPod nanos!

Messy listening center!
Enter Donorschoose, once again.  I have an old pink iPod nano, and two of my friends sent me their old nanos that they don't want.  That gives me 3 choices for kids.  My reading groups have 5 or 6 kids, so I wrote another Donorschoose project for 2 more nanos.  I figured that I might be able to find one more, or two kids can share with a headphone splitter.

Now, to get the books on tape to transfer to audio files for the computer.  I knew it could be done, but I wasn't sure how.  Google to the rescue!  I found that a free program for audio recording and editing, Audacity, could do it for me!  I only needed to buy one, cheap cord: a 3.5 mm stereo cable.


Audacity has a great help wiki (looks like wikipedia!) and the detailed instructions were so easy to follow.  You can find those here.


The plan is to upload 5 books on each iPod and change those out monthly.  Each iPod is a different color, so kids will know which one they have used.  If they get the pink one twice, they can just listen to another book, or *gasp* listen to a book again.  I even hope to start recording students reading some books and having those audio files available.  I can record them reading on my iPhone, or I have a mini microphone for my iPod touch.

And what to do with all those tapes??  Give them to the kids of course!  I'll keep the books, but let the kids take home a tape each.  Maybe they can even win a walkman!  I'm excited I won't have as much to physically store with this new system.

To kick off my new listening center, I decided to make my reading center cards available on Teachers Pay Teachers!  Click the photo below to go check them out!


Here are the cards in my chart.  The hanging sheet show what the centers are for each day of the week. My groups are just handwritten on strips of paper because I was in a hurry, but now that my new ink cartridge finally arrived in the mail. I can print out prettier ones (#islandproblems).

Do you use a listening center?  How do you display your center info for kids?

I'm linking up with Katie from Queen of the First Grade Jungle's Technology Tuesday!

Fern Smith's Thursday's Tech Tips for Teachers

I'm following and linking up to The Clutter-Free Classroom's project for organizing my classroom.  I've done a ton of work so far: gave you a tour of my classroom in the "Before" stage, cleared off a shelf of my stuff so student supplies can go there, cleaned out and organized a shelf for teacher supplies and resources, am still working on my desk (its a slow process!), and made Emergency Sub Plans.

This project is all about storage and using what you already have!


For years and years, I have used white plastic containers originally used for frozen juice to store pencils, colored pencils, and skinny markers.  All I did was put cute contact paper around the container after making juice and washing it out. It covers what was originally printed on the container well and the pattern isn't too busy for me.  I also have the polkadot pattern and love it, but it doesn't cover pre-printed patterns that well, since there is so much white in the design.


When I taught kindergarten and 1st grade, I had shared supplies in the middle of my round tables.  I bought these containers for each table:

I put one juice container in each of the smaller compartments.  One container had pencils, the other had either colored pencils or skinny markers (I would trade about every other week).  The larger compartment was for boxes of crayons with the child's name on it.  I kept glue and scissors in other areas, since I didn't want the kids to have access to these at all times (I am afraid of glued up books and cut hair!!)

You can see the green container inside the red caddy on this table.  This was my kindergarten room back in 2007, back when I had blonde hair! :)  I am helping a reading group with my first Donorschoose project - LeapFrog LeapPads!  The kids LOVED those things!  I gave them to another kinder teacher in my building this year, since my 3rd graders have graduated to iPod touches.  Gotta change with the times!  Read more about Donorschoose here.


What have you upcycled?  How do you store supplies in the classroom?


Welcome to my classroom!

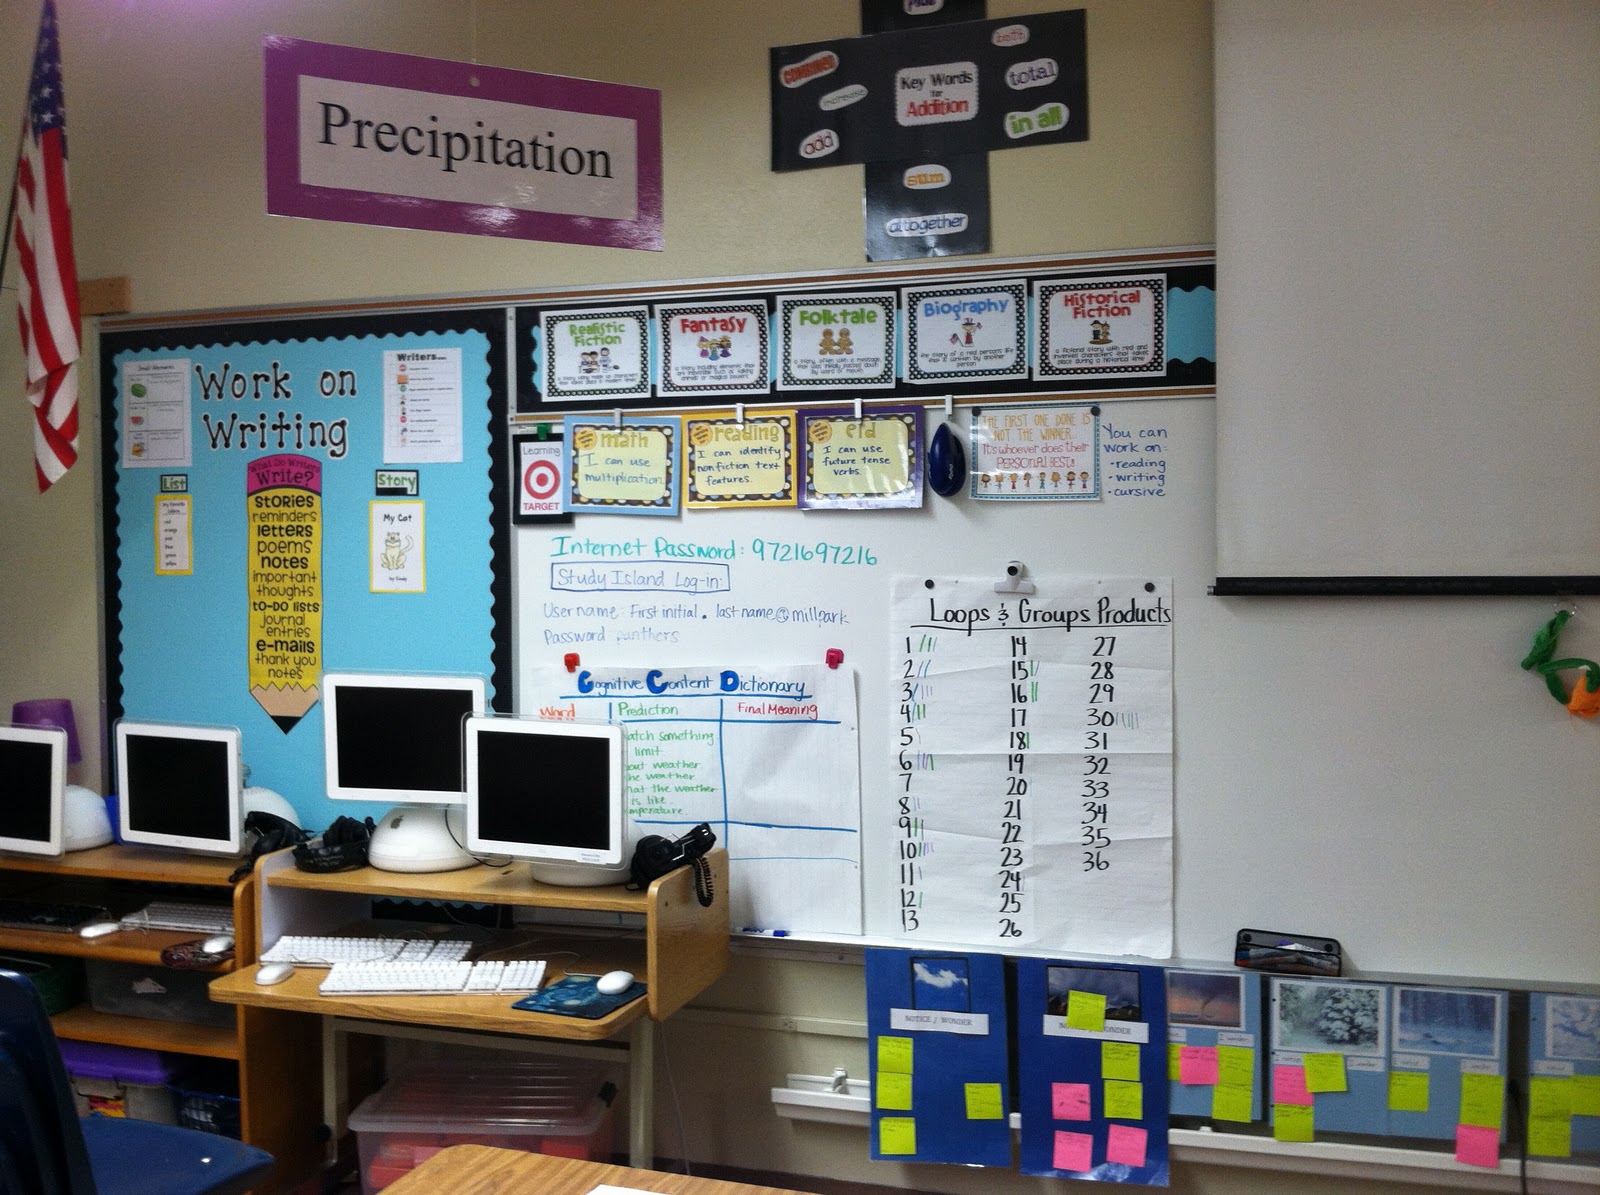
Here are some pictures to guide you around my new room in 3rd grade!  I took advantage of the room move and grade level move to make many changes this year.  First up, you'll see my writing board.  I have some charts up about small moments, some examples of types of writing, and that cute giant pencil from The Teacher Wife.  I love her products!
photo of classroom photo Teaching With Style organization 3rd grade Work on Writing

A farther back picture of that wall.  Notice my learning target sign and the learning target posters from Lesson Plan SOS - they were even sweet enough to make me a custom ELD sign!   The giant plus sign is from The Teacher Wife.  Taped below the chalk tray are observation charts for my OCDE Project GLAD® unit on weather.  Read more about OCDE Project GLAD® here.

photo of classroom photo Teaching With Style organization 3rd grade

Another shot of that same northeast corner.  Here you see the shelves with my math manipulatives.  The shelf on top of the counter has plastic drawers (From the Target dollar section) that hold my work places - math centers from our math adoption Bridges in Mathematics.  Next to that shelf is a wooden listening center organizer.  It holds my tape and CD players, headphones, and chargers for the iPods and DVD players (those get housed in my locked closet when not in use).  I have two iPod touches that I got from a grant from my district's education foundation.  I also have an old nano that I never use, so I loaded it with the audiobooks from our Houghton Mifflin anthology.  I also have two DVD players that I got as a grant from Donorschoose.  I have phonics and sight word DVDs that my low kids can watch, and I also have videos of children's literature that kids can watch with subtitles as an alternate Listen to Reading.
photo of classroom photo Teaching With Style organization 3rd grade math manipulatives

Here is my classroom library.  It faces the northside of the school.  I believe that children need access to many books to choose from; books at their level and books that interest them.  My classroom reading levels range from kindergarten to middle school, so I need to have LOTS of books for my kiddos to access.  I use Scholastic bonus points and ask for donations from friends and family getting rid of books.  My first year of teaching my grandma gave me a ton of novels she had read and didn't want any more.  I took them to a local used bookstore, explained to the salesman that I was a first year teacher, and he let me trade them straight across for children's books.  I went back to that store several times that year, trading in my own books that I knew I would never read again.  This really helped to beef up my library and now my kids can all benefit from that man's kindness!

On the shelf, in the left of the picture, you'll see a big basket with teddy bears in it - this is for Read to Someone.  My kids can choose to read to a teddy bear instead of to another student.  It is so cute to watch them cuddled up with a bear and reading to it, like they are the teacher and the bear is their student!  I also have some round rugs (from Ikea) and pillows (mostly made by my mom) for kids to cuddle up with during Read to Self.
photo of classroom photo Teaching With Style organization 3rd grade classroom library

Here is where the library and the math manipulative corner meets.  Nothing too exciting.  Books on tape/CD are hanging, the wire drawers have supplies for Work on Writing (story starters, blank booklets to write stories on, sheets to write lists), and a small basket with DIY whisper phones.  I bought pieces of PVC pipe and corners.  My hubby cut the pipe and I glued an elbow piece to each end, then spray painted them lime green for a pop of color.  Some of my third graders still read out loud when reading to themselves, so this helps cut down on the noise.  I'll have to do a quick tutorial someday - they are seriously so easy to make.
photo of classroom photo Teaching With Style organization 3rd grade listening center

A close up of the "teddy bear" corner of my library, facing the northwest side.  In the shelf on the counter, I always keep content area books.  Right now, I have books about weather in there, since that's what we are studying in science.
photo of classroom photo Teaching With Style organization 3rd grade classroom library

I love my book organizing system.  I always know where every book is when I want to find it.  I'll have to post about that another day.
photo of classroom photo Teaching With Style organization 3rd grade classroom library

Here is a pictorial input chart about states of matter.  It goes with my current OCDE Project GLAD® unit.  Read more about OCDE Project GLAD® here.
photo of classroom photo Teaching With Style organization 3rd grade GLAD language acquisition ELL ESL

A water cycle input chart and chant.  I love OCDE Project GLAD®!
photo of classroom photo Teaching With Style organization 3rd grade GLAD language acquisition ELL ESL

Here is the top of the northwest corner.  My classroom promises are from Debbie Miller's Teaching with Meaning.  I put it up on these super tall bulletin boards, since they aren't very accessible.  I figured it would be good to be able to see our promises all year long.  The faces art projects were a math glyph from our math adoption, Bridges in Mathematics.  I made the fabric bunting after seeing one in Abby's classroom over at The Inspired Apple.
photo of classroom photo Teaching With Style organization 3rd grade Our Promises

Here is a shot of the southeast corner.  Behind that door is the girls bathroom.  The classroom next door and I share that bathroom.  You can see my schedule and classroom jobs cards on the white board.  My desk is turned diagonal.  Behind my desk is my problematic shelves and closet.  I've been working on them this week and they already look WAY better!  You'll also see a glimpse of my mailbox slots in the right of the picture.  I got those from Donorschoose last year and they are so awesome.  I couldn't imagine sorting all that paper myself anymore.  I only have kids turn things in that I want to grade.  Sometimes I will give kids a stamp on their paper before they can put it in their mailbox - that way I can walk around and check if they had done the work correctly.  
photo of classroom photo Teaching With Style organization 3rd grade

Here's a wider view of my whiteboard and writing bulletin board.  One table a week who wins the table point competition get to sit on yoga balls for the week.  They LOVE it!  It's a great reward to good behavior!  I got the balls from Donorschoose.  
photo of classroom photo Teaching With Style organization 3rd grade yoga balls

Here's a view of the front door, the south side of the school.  You'll see the blue set of cubbies - there are 25 slots, but wait, I have 32 students!!!  Ya, it doesn't work out too well.  My teacher table is to the right.  That's where I meet with small groups.  The shelf behind it houses all the word work materials. There is the boys bathroom that connects my room to my bestie, Carla's room.  Next to the bathroom is a tall bookshelf where the kids put their book boxes.  Our principal bought bookboxes from Really Good Stuff this year for the whole school.  They are so much nicer than the cardboard Ikea ones we used to use!
photo of classroom photo Teaching With Style organization 3rd grade yoga balls

Here's a wider shot of the northwest corner.  I still have a string of Christmas lights up.  Need to take those down!!
Above each table is a colored tissue pom-pom, made from this Martha Stewart tutorial, but inspired by this beautiful classroom from Pinterest.  I hang vocabulary words from the bottom of each pom pom to be the table name.  Right now, the table names are vocab words from our weather unit.  Next, they will be geometry vocab words.  I just love this idea!  It's cute, and educational!
photo of classroom photo Teaching With Style organization 3rd grade

 Here is the west wall.  You can see my calendar, CAFE board, and a pocket chart for math vocab words.  I painted my bulletin boards turquoise at the beginning of the school year.  I just love them!
photo of classroom photo Teaching With Style organization 3rd grade

So there you have it.  A super long tour of my classroom.  I still have a ton more I want to show you, so make sure to follow along! :)

Do you use whisper phones like me?  Or what about yoga balls?  Maybe you use something else as a reward for the winning table group?  I'd love to hear about it!

Do you have a wish-list a mile long for things for your classroom, but can't afford it all yourself?  DonorsChoose can help!  DonorsChoose is a non-profit organization where teachers can go on, create a profile, and request items for their classroom.  Family, friends, student's parents, even strangers can make secure, tax-deductible donations to your project.  When it is funded, DonorsChoose purchases the items and sends them directly to your school.  You, the teacher, write a thank you letter, take pictures of the students using the items, and have the students write letters as well.  It takes about 20 minutes to write up a proposal and about an hour to gather all the materials for the "thank you package", but in the end, you have valuable supplies for your classroom that you wouldn't normally have!

I've raised over $4,000 for my classroom in the past five years!  I didn't have any projects during the 2009/2010 school year.  That is the year I had my daughter and returned to school part time for the rest of the year.  I guess I didn't have much time for fund raising that year! :)

Here are some tips for teachers who are new to DonorsChoose:
  • Browse the website to see how teachers word their projects.  It can help get an idea of what to write in each section.  I sometimes peruse other teacher's projects from my school district to get inspiration.
  • Link your DonorsChoose account to your Facebook page.  Many of my projects have been funded by family and friends who saw my project on my Facebook page.  People's generosity is surprising and heartwarming.
  • Look on the eMall (online shopping page through Donorschoose) to see what products they offer.  They only do business which certain vendors and it can be hard to get certain types of items.  For example, I wanted to get book bags through Really Good Stuff.  They are not a preferred vendor, and I was unable to make a special request for the bags since the DonorsChoose staffer who reviewed my project thought I could find similar products through a preferred vendor.  Needless to say, I was unable to find what I wanted and that project was never submitted.
  • Keep an eye out in the media for special offers for free DonorsChoose codes.  When the movie Waiting for Superman came out, they offered $3 codes just for pledging to see the movie.  Bing.com offered $3 codes for changing your homepage to Bing.  I sent an email to friends and families asking them to partake in these special offers and got several projects funded last year because of it. 
  • Don't forget to send in your Thank You Package on time.  There is a little Thank You % at the end of your profile that people can see.  If it is less than 100%, people will be less inclined to donate to your class.  I always set my Thank You Package date to the last possible day allowed, giving myself plenty of time to get it in.

To say that I am obsessed with DonorsChoose is an understatement!  They have partnered up with some great companies to give even more to teachers: Bing.com, the Bill and Melinda Gates Foundation, Sonic Drive-ins, Horace Mann insurance company, even Stephen Colbert endorses DonorsChoose on his show The Colbert Report (Stephen is on the Board of Directors, too!)

Now get out there and make a project or donate to one.  :)